Peppermint Cake Roll
This post contain affiliate links.
Cake rolls have never really been my thing. However, I love they way they look and taste. So here I go again trying to master the cake roll. It all started when I decided that I would make a Buche de Noel for my Christmas cake this year. I decided I was going to master the rolled cake if it was the last thing I did.
Then I saw this great cake from Lisa’s Wineandglue blog and thought this would be the perfect thing to use as a “dry run” for my Buche de Noel. So, off I go.
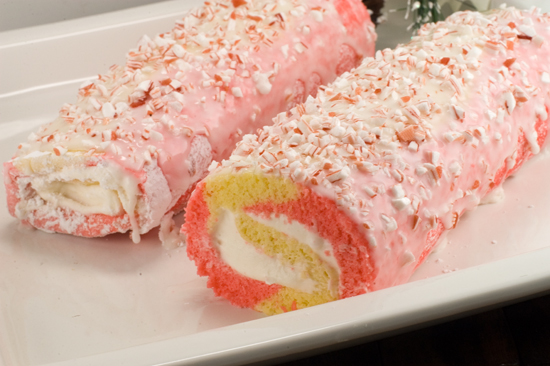
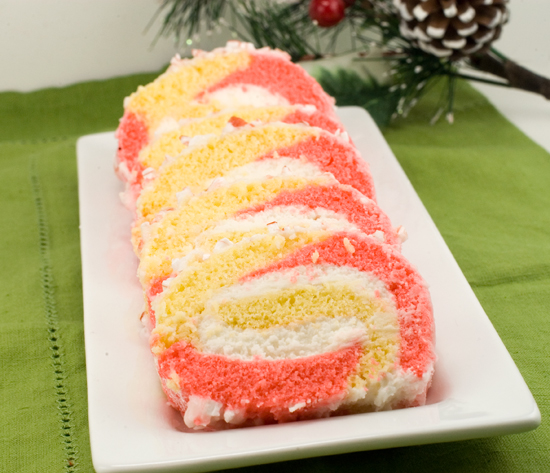
Making the cake was very simple. However, the first time I made it (yes, you heard me right), I made the stripes of colored cake batter in the wrong direction. So, when the cake would be rolled with the widest end, instead of having red and white colors of cake per slice, I would’ve had all white or all red. The cake came out fine, but it just wasn’t right. You need red and white in every slice. So…back to the drawing board, and I made another cake. This time putting the stripes of batter from left to right on the longest part of the pan (15″ side). That way, when you roll it up starting with the longest side (15″), you will get both red and white cake.
When flipping the cake onto the dish towel after baking, the second time I didn’t put any confectioners sugar on the towel first. Bad move. The cake slightly stuck to the towel (not so much that it ruined the cake), but enough that my hands were all sticky and the towel was sticky. It was much easier putting the confectioners sugar like the directions dictate. Also put more food coloring than you think you need. I thought I had enough with about 10 drops and my cake came out dark pink instead of red!
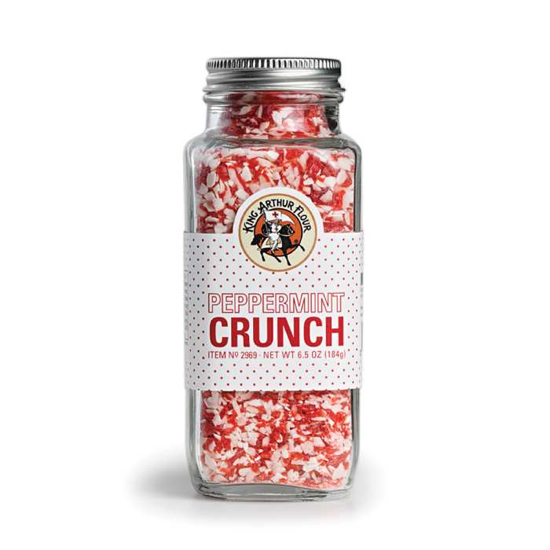 I did change the filling a tad. I put less butter in by half, and added some Marshmallow Fluff. It came out pretty good, but then again what frosting recipe doesn’t taste good? I think I will use this filling for my Buche de Noel and include some Peppermint Crunch to it. Chocolate cake with a crunchy peppermint filling, and chocolate frosting….what’s not to like?
I had absolutely no problem rolling and re-rolling the cake as I’ve had in the past. Maybe I’m starting to master this rolled cake thing after all! I hate to fail at anything, hence the making of the second cake. I’m glad I did. It came out looking pretty good, and tasting even better. This is a great recipe for holiday time!
Peppermint Cake Roll
Ingredients
- For the cake:
- 1 cup flour
- 1/2 tsp baking powder
- 1 tsp cream of tarter
- 1 cup granulated sugar
- 3 large eggs
- 1/3 cup water
- 1/4 cup powdered sugar
- 1/4 tsp red food coloring
- For the filling:
- 2 cups powdered sugar
- 6 Tbsp unsalted butter, softened
- 1/4–1/2 cup Marshmallow Fluff
- 1 tsp peppermint extract
- For the topping:
- 1 cup powdered sugar
- 1–1/2 Tbsp milk
- 1/8 tsp. peppermint extract
- Peppermint Crunch
Instructions
- Preheat your oven to 375 degress F, and line a 10 by 15 inch jelly roll pan with aluminum foil. Spray the foil with cooking spray and sprinkle with flour.
- Sift the flour, baking powder, sugar, and cream of tartar together, mix until just combined.
- In a stand mixer with a whisk attachment, beat the eggs and 1/3 cup of water together on high until they are light and airy, about five minutes.
- Gently fold the egg mixture into the flour mixture, being careful not to over mix.
- Divide the batter into two, and dye one half red.
- On the long side of the pan (15″) , gently pour a spoonful of the red cake batter all along one edge. Then a row of white, then a row of red, and so on. I had four rows of each color in the end, and had to work once all the batter was added to the pan to make sure it was completely spread out.
- Bake 10 to 12 minutes or until the white begins to turn golden brown.
- While the cake is baking, spread a clean kitchen towel on a large cutting board.
- Use your 1/4 cup of powdered sugar to cover the kitchen towel completely.
- When the cake is done baking, flip the entire pan over onto the kitchen towel and gently peel away the aluminum foil.
- Working at the long end, roll the cake into the kitchen towel. This will give the cake its rolled form. Leave the cake for at least one hour, but not more than four hours.
- While you are waiting to unroll your cake, mix together the 6 Tbsp softened butter, two cups of powdered sugar, marshmallow fluff and the peppermint extract. Don’t refrigerate the frosting while you are waiting for your cake!
- Unroll your cake. Spread the frosting evenly over the cake and roll it back up. (This time without the towel).
- Roll the cake in aluminum foil and chill for at least an hour before serving, but do not wait more than a day or two to serve or the cake will dry out.
- When you are ready to serve, whisk together the topping of powdered sugar, extract and milk. Pour over cake (you may need to do some spreading) and top with Peppermint Crunch.
- Category: Cake