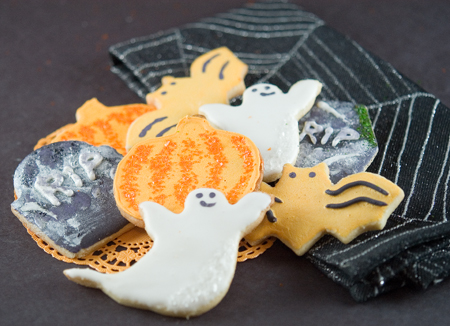
This is my first attempt at decorating cookies with Royal icing. I started this project, because I needed some tombstones for my Spooky Halloween Cake. I had loads of leftover sugar cookie dough from my favorite Sugar Cookie Dough recipe, so I decided to make some other shapes as well to use up the dough. I have several observations after having made my first attempt.
One, cookie dough was a breeze, as it has been every time I’ve made it. I may have made the cookies a little thinner than most, but they still hold up beautifully.
Two, I’ve got to hand it to those that can make outlines perfectly. I’m sure practice makes perfect, but I know it has a lot to do with “perfect consistency” of the icing, and being able to get the technique perfected, and most of all, no shaking. I’ve never thought of myself as a shaky person, but try and put the outlines on a little cookie, and see if you shake!
Three, I get the concept of the flooding (and this is probably my favorite step, as it’s just like coloring in a coloring book), but I was insistent on trying to flood the cookies without the outlining step. Firstly, because I didn’t like the look of the outlined cookie, and seeing that I was using my tombstones on top of a cake, I didn’t want the cookie showing at all. I must have had my flooding icing at just the right consistency, because I was able to flood the cookies perfectly without the icing running profusely all over the place. So if you can get the exact consistency down, I may not need that extra step of borders.
Four, due to the fact that it’s Halloween, there seems to a lot of black food coloring involved. I had to use a whole small container of gel food coloring to get the black color! Is this normal? Not to mention, I seemed to get the black all over everything! I can just imagine the little ones faces after eating an all black cookie! I think I’ll try and stick to colors other than black.
I’ve got to give credit to everyone that makes these cookies! Especially Annie from Annie’s Eats! Wow, does she do a perfect job! It certainly gives me something to strive for. These cookies take a lot of time and effort to make! They are gorgeous in the end, and there is pure satisfaction in your finished masterpiece! Oh, and by the way, I do realize there’s no such thing as orange bats!
I’ll give it another try at Christmas time!
Sugar Cookies
6 c. all-purpose flour
3 tsp. baking powder
1 tsp. salt
2 c. unsalted butter
2 c. granulated sugar
2 large eggs
2 tsp. vanilla extract
Cream sugar and butter until fluffy, about 5 minutes. Add eggs and vanilla. Mix dry ingredients in separate bowl and add to butter mixture. Mix well.
Put a handful of the freshly made dough between two sheets of parchment paper and roll to desired thickness. Repeat with the rest of the dough. Put the rolled dough, including the parchment paper, on a cookie sheet and refrigerate for 10 minutes or longer. Your dough will be chilled and ready to cut and bake with no wait and no added flour! Repeat with scraps after cutting cookies.
Bake at 350 degrees for 8 -10 minutes. Let cool.
Royal Icing
3 Tbsp meringue powder
1 lb. (4 cups) confectioners sugar, sifted
6 Tbsp warm water
Beat all ingredients with electric mixer until icing forms peaks (7-10 minutes at low speed with a heavy duty mixer, 10-12 minutes at high speed with a hand held mixer). Makes 3 cups.
To thicken icing, add more confectioners sugar. To thin add a little more water.


2 Comments
Annie
October 30, 2011 at 5:00 pmI think your cookies look great, especially for your first royal icing experience. You’ll only get better with practice.
SJ
October 30, 2011 at 6:18 pmOh Annie, you’re way too nice! I will keep trying though. I can’t believe the work that goes in to these cookies! Thanks!