
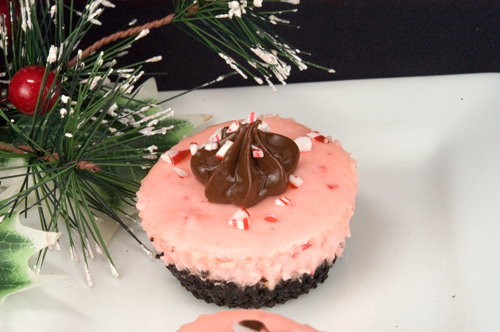

I noticed these cute little cheesecakes on Annie’s Eats blog. She has such great recipes, I would encourage anyone to visit her blog for some great recipes. I made two recipe from her blog this Christmas season alone!
I love cheesecake, so any flavor is fine by me. These cheesecakes were so fun and festive I had to make them this holiday season! The only thing I would adjust for my liking is to cut down the peppermint extract by half. The kisses have peppermint in them and along with the teaspoon of extract the original recipe called for, it seemed too much for my taste. I made in regular cupcake size though, as I didn’t have the mini silicone liners or cupcake papers.
They came out truly delicious anyway, and anyone that likes peppermint, would love these little cheesecakes.

Peppermint Mini Cheesecakes
- Yield: 24 1x
Ingredients
- For the crust:
- 1 c. chocolate cookie crumbs (I used Nabisco thin chocolate cookies)
- 2 Tbsp unsalted butter, melted
- 1 Tbsp sugar
- For the cheesecake:
- 12 oz. cream cheese, at room temperature
- ½ c. sour cream
- 2/3 c. sugar
- 1 large egg
- 1/2 tsp. peppermint extract
- Pinch of salt
- Pink food coloring (optional)
- 25 white chocolate candy cane kisses, chopped
- For the topping:
- 4 oz. bittersweet chocolate, finely chopped
- ½ c. heavy cream
- 1 Tbsp unsalted butter, at room temperature
- Coarsely crushed candy canes, for garnish
Instructions
- Preheat the oven to 350˚ F.
- Lightly spray a 24-well silicone mini muffin pan with cooking spray. (If using a non-flexible pan, line with mini cupcake liners.)
- To make the crust, combine the chocolate cookie crumbs, melted butter and sugar in a small bowl. Mix with a fork until evenly blended. Divide the crust mixture between the wells of the prepared pan, about 2-3 teaspoons in each. Press the crumb mixture into a flat layer on the bottom of the well. (The bottom of a shot glass or flat utensil is great for this. I use the flat bottom of my whisk handle.) Bake for 10 minutes. Transfer the pan to a wire rack.
- Reduce the oven temperature to 300˚ F. To prepare the filling, combine the cream cheese and sour cream in the bowl of an electric mixer. Beat on medium-high speed until smooth and well blended. Add in the sugar and mix until incorporated, about 1 minute more, scraping down the sides of the bowl as needed. Blend in the egg, peppermint extract and salt. If desired, tint the batter light pink with food coloring. Continue to beat until the mixture is completely smooth. Fold in the candy cane kisses with a spatula.
- Divide the mixture evenly over the cookie crumb crusts and smooth the tops slightly. Bake just until set, about 22 minutes, rotating the pan halfway through baking. Transfer to a wire rack and let cool in the pan to room temperature. Once completely cool, transfer the pan to the refrigerator and chill thoroughly before removing the cheesecakes, at least 3 hours.
- Once the cheesecakes are well chilled, carefully remove them from the pan. To make the ganache, place the chopped chocolate in a medium bowl. In a small saucepan, bring the cream to a simmer over medium heat. Once simmering, remove from the heat and immediately pour over the chocolate. Let stand 1-2 minutes. Whisk in small circular motions until a smooth ganache has formed. Whisk in the butter until completely incorporated. Let the mixture stand at room temperature until slightly thickened for piping onto the cheesecakes. (Speed this process in the refrigerator or freezer, but be sure to whisk every 10 minutes or so.) Once the ganache has thickened, transfer to a pastry bag fitted with a decorative tip and pipe onto the cheesecakes. Sprinkle with crushed candy canes. Refrigerate until the ganache is set.


No Comments