I’ve always loved those “Snoball” cakes made by Hostess with the marshmallow coconut frosting, chocolate cake and cream in the middle. I saved this recipe from Chocolatier magazine for Snowballs having every intention of making them “some day”. Seriously, I’ve had this magazine with this recipe in it since September of 1989! So much for “some day”. I just didn’t think it would be 23 years later! I have no idea how I didn’t lose it or throw it away in all these years! I finally bought those ball pans (although you can make from cupcake pans as well), I’ve been meaning to get for all of these years.
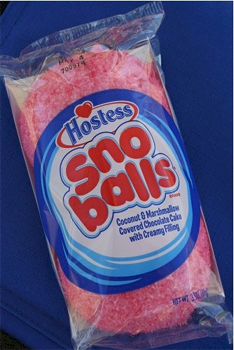
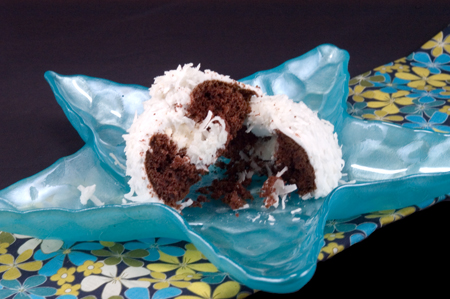
I have always disliked home made cupcakes and cakes because I want them to have the texture of a boxed cake, and they never do. I have to tell you, these little cakes actually do. The cakes are light and airy like a boxed cake, and are very flavorful! Exactly what I want for the perfect snowball cake!
Now, for the filling. The original recipe calls for a whipped cream filling. That is OK if you mean to use these all at once, or are out in the hot weather. Otherwise any marshmallow or white cream filling will do. The cakes seem rather light and delicate to hold the piped in cream, so be careful not to overfill or they will “break apart”. If they do, its OK. When you ice with the marshmallow icing, they will stay together no problem. Let the icing set and the icing will be just like those famous Snoball cakes in the cellophane.
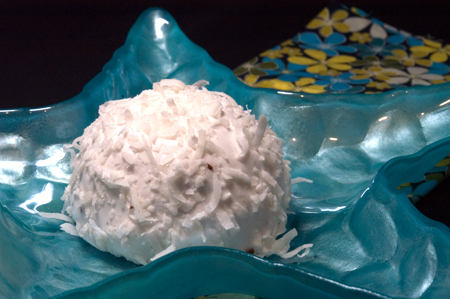
The frosting is a marshmallow based frosting, which is meant to emulate the frosting on the Hostess Snoball cakes. The icing recipe is basically easy, it just takes a little time getting to the temperatures needed to make the marshmallow. I assure you, it is well worth it in the end.
However you slice it, these cakes are the perfect home made version of the Snoball cake!
PrintChocolate Snowballs
- Yield: 7 1x
Ingredients
- Chocolate Cakes:
- 3/4 c. plus 2 Tbsp sifted cake flour (not self rising)
- 1/4 c. unsweetened non-alkalized cocoa powder
- 3/4 tsp baking soda
- 1/8 tsp salt
- 3 Tbsp unsalted butter, softened
- 2 Tbsp solid vegetable shortening
- 1/3 c. plus 3 Tbsp granulated sugar
- 1 large egg, separated, at room temperature
- 2 tsp. vanilla
- 1/2 c. buttermilk, at room temperature
- Whipped Cream Filling:
- 1/2 c. heavy whipping cream
- 1–1/2 tsp. granulated sugar
- 1/2 tsp vanilla extract
- Marshmallow Frosting:
- 1/2 c. plus 2 Tbsp water
- 4 tsp unflavored gelatin
- 3/4 c. granulated sugar
- 3/4 c. light corn syrup
- 1 large egg white, at room temperature
- 1–1/2 tsp vanilla extract
- 2–2/3 c. sweetened flaked coconut (7 oz bag)
Instructions
- Making the chocolate cakes:
- Position rack in center of oven and preheat oven to 325 degrees F. Grease & flour 12 snowball cupcake pans, or approx. 18 cupcake pans. Tap out excess flour.
- In a medium bowl, stir together the flour, cocoa, baking soda and salt. Sift the flour mixture on to a piece of waxed paper.
- Using an electric mixer, beat butter and shortening for 30 seconds, until creamy. Gradually beat in 1/3 c. plus 1 Tbsp of the sugar. Beat in the egg yolk and continue beating for 1 to 2 minutes, or until light, occasionally scraping down the sides of the bowl. Beat in the vanilla. At low speed, in three additions each, alternatively beat in the buttermilk and the flour mixture, beating well after each addition.
- In another bowl, with an electric mixer on low speed fitted with wire whisk, beat the egg white until frothy. Increase speed to medium high, and continue beating the egg white until they start to form soft peaks. One teaspoon at a time, gradually add the remaining 2 Tbsp of sugar. Continue beating the whites until they form stiff, shiny peaks when the beaters are lifted.
- Fold one third of the beaten egg white in to the batter to lighten. Fold the remaining egg white into the batter. Using a tablespoon (or I used a 2-1/2 inch spring loaded ice cream scoop), divide the batter between the baking cups.
- Bake for 20-25 minutes, or until a cake tester or toothpick comes out clean. Cool the cakes in the pans for 10 minutes, and then remove from pans to a wire rack and cool completely.
- Making the Whipped Cream Filling:
- In a chilled, medium bowl, using an electric mixer fitted with a wire whisk at medium speed, beat the cream, sugar and vanilla, until stiff peaks start to form.
- Fill a pastry bag with the whipped cream fitted with a decorator tip, and pipe whipped cream into cake from the bottom.
- Place the filled cakes on a baking sheet and refrigerate while preparing the marshmallow frosting.
- Making the Marshmallow Frosting:
- In a small cup, place 1/4 cup plus 2 Tbsp of the water. Sprinkle gelatin over water. Let gelatin soften while cooking the sugar syrup.
- In a heavy, medium saucepan, combine the sugar, corn syrup and the remaining 1/4 cup water. Cook over medium low heat, stirring with a wooden spoon or silicone heat resistant spatula, for 3-4 minutes, or until the sugar dissolves. Raise the heat to medium and bring the mixture to a boil, and cook the mixture for 10-15 minutes, until the syrup registers 240 degrees F (soft ball stage) on a candy thermometer. When the mixtures reaches 230 degrees F on the candy thermometer, start preparing the beaten egg whites.
- In the bowl of an electric mixer, fitted with a wire whisk beater on medium high, beat the egg whites until stiff, shiny peaks start to form. At this point, the syrup should register 240 degrees F on the candy thermometer. Remove the saucepan from the heat and stir in the gelatin mixture. Transfer the hot gelatin mixture to a heat resistant 2 cup measuring cup.
- At medium low speed, gradually pour the hot gelatin mixture down the side of the bowl, in to the beaten egg white. Continue beating for 8-12 minutes, or until the mixture is cool, and forms soft, glossy peaks when the beaters are lifted. Use the frosting immediately; as it starts to set it will become harder to work with.
- Frost and Decorate the Chocolate Cakes:
- Place coconut into a medium bowl. Remove the chocolate cakes from the refrigerator. Using a spatula, frost the top and side of the cakes, and sprinkle with coconut. Store in airtight container for up to 2 days in the refrigerator.
Notes
The original recipe calls for pans with a 2-1/4 ” snowball size. I believe they are 8 to a pan. My snowball pans are approx. 2-1/2″, and are 6 to a pan.
If you are using the larger size, you may want to double this recipe as this recipe only makes 7 of the larger size.
This recipe may seem daunting at first, but it really is quite easy. The only thing that may be a challenge is the marshmallow frosting. I’ve never made these before and had no trouble. Just make sure you have the equipment you need.
The hardest part of this recipe was typing it onto this blog. Seriously. And when you see the results, you will think as I did, that it was worth it! Enjoy!

4 Comments
Colleen, The Smart Cookie Cook
May 31, 2012 at 5:11 pmI am so excited about this! I LOVED those hostess snowballs, and this looks like a perfect replica. Except I’m sure it tastes even better.
SJ
May 31, 2012 at 5:32 pmThe cake in these really tasted and had the consistency of the Hostess ones. The marshmallow took a little time but was exactly like the marshmallow on the Hostess ones also!
Monica Filush
September 17, 2014 at 7:52 pmThank you for making this recipe and giving a good description the results. It was very helpful and motivating. Going to give it a go!
Monica Filush
September 17, 2014 at 7:49 pmBless your heart for sharing this! I can’t wait to try it!